HPC Scheduler
The HPC Scheduler provides a simple way to run long-running research workloads across the CARES compute cluster - GPU machines for Machine Learning. Instead of connecting directly to individual machines, users submit Docker-based jobs through a web interface or python-api, specify the required runtime and datasets, and the scheduler automatically selects an appropriate worker machine to execute the job. The system manages job queues, tracks resource usage, stores outputs on the shared NAS, and provides access to logs and execution status through the web portal. This allows researchers and students to run experiments reliably across shared hardware while ensuring fair access to cluster resources.
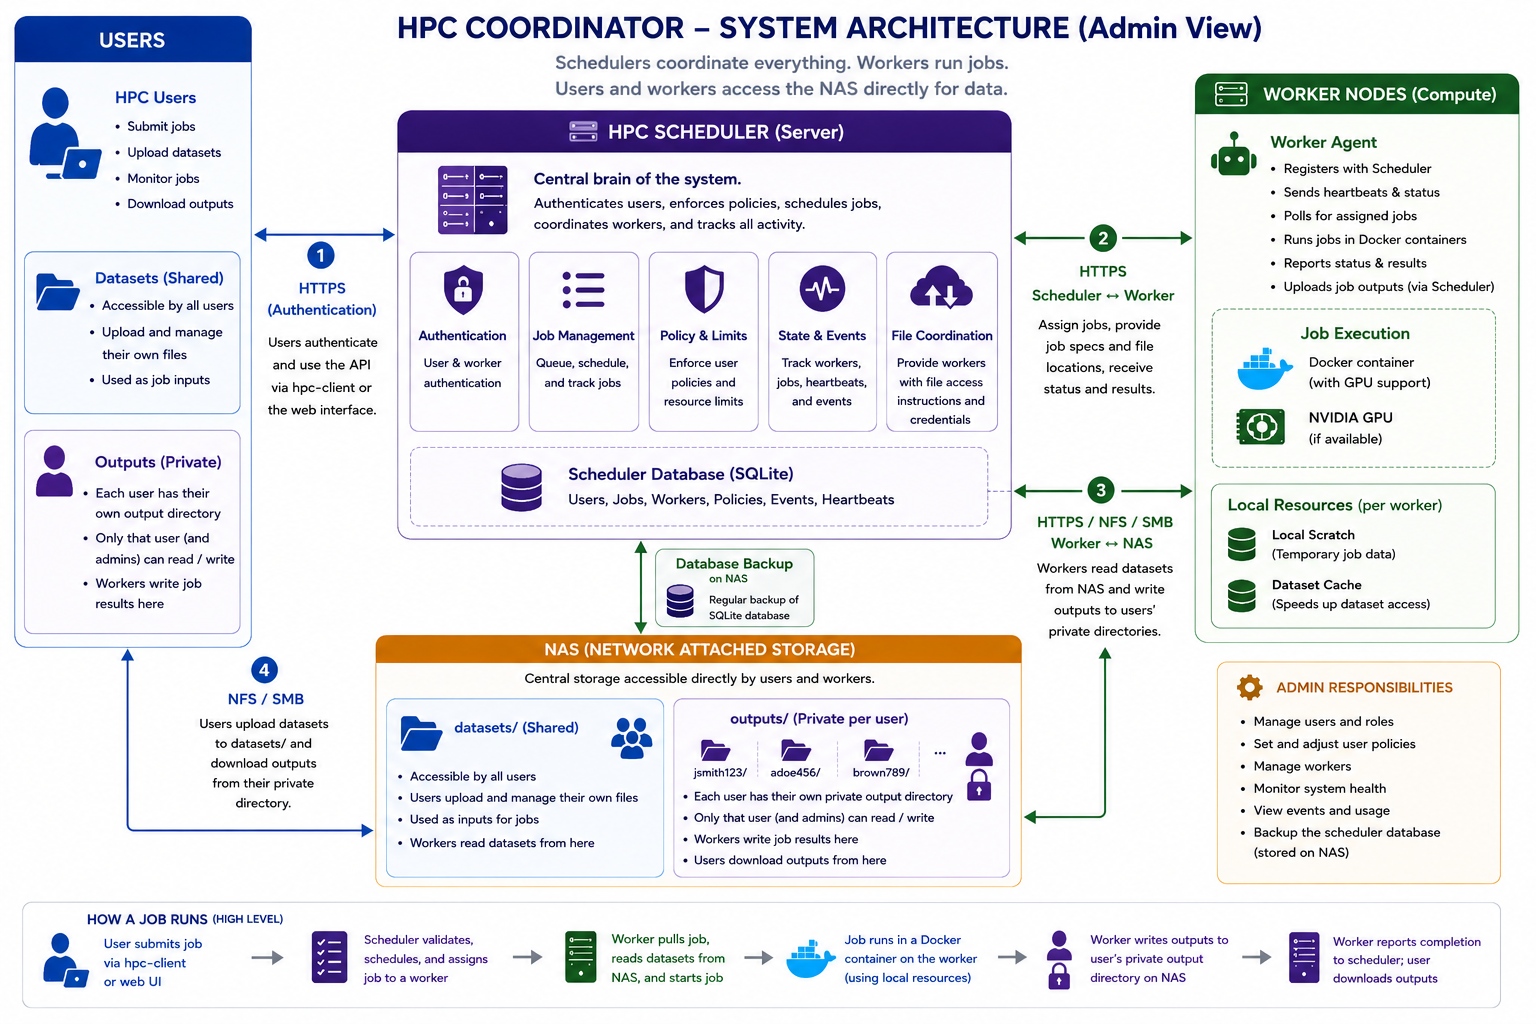
User Guide
This quick guide walks through the complete workflow for running jobs on the CARES HPC cluster.
By the end of this guide you will know how to:
- Access the HPC system
- Upload datasets
- Build Docker images
- Submit jobs
- Monitor progress
- Retrieve results
Specific details about each section can be found in the corresponding documentation pages:
- How to Create a Docker Images
- How to upload and manage a Datasets
- How to manage results and Outputs
- Best Practices for using the HPC effectively
The typical workflow is:
Write Code
    ↓
Build Docker Image
    ↓
Push Image
    ↓
Upload Dataset
    ↓
Submit Job
    ↓
Monitor Logs
    ↓
Collect Results
Not for Interactive Workloads
The CARES HPC cluster is designed for running completed workloads, not for interactive software development.
Before submitting a job you should:
- Develop and test your code locally
- Build a Docker image containing all required code and dependencies
- Verify the Docker image runs correctly on your own machine
- Upload any required datasets to the CARES NAS
- Submit the job to the scheduler
Jobs
A job file tells the scheduler:
- which Docker image to run
- how long the job is allowed to run
- which datasets are required
- whether the job needs a specific worker
- what command to run inside the container
Docker Containers are Temporary
All Jobs run inside Docker containers.
Docker Containers are temporary. Save anything you want to keep into:
/workspace/output
Datasets requested in job.json are mounted read-only at:
/workspace/datasets/<dataset_name>
Outputs
Outputs are files you want to keep after a job finishes, such as:
- Model checkpoints
- Training logs
- CSV files
- Figures
- Reports
- Videos
Must be saved to:
/workspace/output
inside of the Docker container.
The scheduler will then transfer those files back to the NAS and make them available under:
/cares-nas/hpc/outputs/<upi>/<job_id>
Step 1: Request an Account
Accounts are created by the HPC administrators - please contact Henry, Finn, or David on the CARES Slack to request an account. For further support questions please contract the support team on the cares-hpc-support channel.
Contact the administrators and provide:
- Name - first and last
- UPI
- University email address
- Supervisor name
- Intended HPC usage
Once your account has been created you can log in to the scheduler.
You will will also recieve an account for the CARES NAS where you can upload datasets and access job outputs.
Users cannot create their own accounts.
Users cannot create their own accounts through the client or web portal.
Contact the HPC administrators to request an account before attempting to log in.
Step 2: Develop Your Code
Write your code and verify it runs correctly on your own machine.
The HPC Scheduler only runs code that is included in your Docker image.
Code Must Be in the Docker Image
The HPC Scheduler only runs code that is included in your Docker image.
You cannot run arbitrary commands on the worker machines.
If you want to run a script, it must be included in the image and specified as the entry point.
Step 3: Build a Docker Image
Example project:
project/
├── Dockerfile
└── main.py
Example:
import pathlib
import time

output_dir = pathlib.Path("/workspace/output")
output_dir.mkdir(parents=True, exist_ok=True)

for i in range(60):
    print(f"Count: {i}")
    time.sleep(1)

(output_dir / "result.txt").write_text(
    "Finished successfully\n",
    encoding="utf-8",
)
Dockerfile:
FROM python:3.11-slim

WORKDIR /app

COPY main.py .

CMD ["python", "main.py"]
Build:
docker build -t count-to-60:latest .
Test locally:
docker run --rm count-to-60:latest
Code Must Be in the Docker Image
The HPC Scheduler only runs code that is included in your Docker image.
You cannot run arbitrary commands on the worker machines.
If you want to run a script, it must be included in the image and specified as the entry point.
Job Must Be Self-Contained
Jobs should be self-contained and executable without manual intervention.
A submitted Docker image should contain everything required to perform the task:
- Source code
- Python packages
- System dependencies
- Configuration files
- Training scripts
- Evaluation scripts
Step 4: Push the Image
The image must be pushed to a registry accessible by the HPC cluster. We currently support the CARES registry at 130.216.238.2:5500 or Docker Hub. We recommend using the CARES registry for better performance and reliability and unlimited storage. For full instructions on how to build and push images to the CARES registry, see the Docker Images Documentation.
Pushing to the CARES Registry
Tag the image with the CARES registry address:
docker tag \
    count-to-60:latest \
    130.216.238.2:5500/count-to-60:latest
Push the image to the CARES registry:
docker push \
    130.216.238.2:5500/count-to-60:latest
Verify the image is available:
docker pull \
    130.216.238.2:5500/count-to-60:latest
Trust Docker Registry
See Docker Registry Configuration for instructions on how to add the HPC Docker registry to your trusted registry list.
This only needs to be configured once per machine.
After the registry has been added to Docker's trusted registry list, images can be pushed and pulled normally.
Pushing to Docker Hub
Follow the instructions in the Docker Hub Documentation to push your image to Docker Hub.
Step 5: Upload a Dataset
Datasets are stored on the shared CARES NAS: http://130.216.238.2:5500. When you register for an HPC account, a folder is created for you on the NAS under datasets/<upi>. You can upload datasets to this folder and then specify them as required datasets when you submit your job. For full instructions on how to manage datasets, see the Datasets Documentation.
Create a folder for your dataset in the datasets directory:
datasets/
└── project_xyz
Upload your files:
datasets/
└── project_xyz
    ├── train
    ├── test
    └── metadata.csv
The folder name becomes the dataset name for when you submit your job.
Example:
{
  "required_datasets": [
    "project_xyz"
  ]
}
Inside the container:
/workspace/datasets/project_xyz
Step 6: Submit a Job
A job file is a simple JSON document that tells the scheduler how to run your Docker container.
Job Details
A job requires the following details to instruct the worker machines on how to run your containers:
job_name
Human-readable name for the job.
"job_name": "training_run_seed_1"
Examples:
mnist_seed_1
ppo_ball_in_cup_seed_3
resnet50_baseline
image
Docker image to run.
CARES Registry example:
"image": "130.216.238.2:5500/count-to-60:latest"
Docker Hub example:
"image": "python:3.11-slim"
UI handles Docker Hub and CARES Registry
The HPC web portal automatically handles both Docker Hub and the CARES Registry with a toggle button to indicate if the iamge is on the CARES registry.
See Docker Images Documentation for instructions on how to build and push images to the CARES registry.
max_runtime_hours
Maximum runtime in hours.
"max_runtime_hours": 4.0
If a job exceeds this runtime, the worker terminates the container.
Examples:
| Value | Runtime |
|---|---|
| 0.5 | 30 minutes |
| 1.0 | 1 hour |
| 4.0 | 4 hours |
| 12.0 | 12 hours |
Overstimate Runtime Limits
Users are expected to set a realistic runtime limit based on the expected duration of the job. It is better to set a slightly higher runtime limit than expected rather than setting a limit that is too low and having your job terminated before it finishes.
Set Realistic Runtime Limits
Setting an appropriate runtime limit helps the scheduler manage resources effectively.
If your job genuinely requires a long runtime, set a higher limit.
If your job is expected to finish quickly, set a lower limit to free up resources for other users.
command
Optional command override.
Use the Docker image default command:
"command": null
Override the command:
"command": "python train.py --seed 1"
The command runs inside the container.
Use Command Overrides for Sweeps
Command overrides are useful for running multiple similar jobs with different parameters without needing to build a new Docker image for each job.
For example, you can build one image containing your training code and then submit multiple jobs that override the command to specify different random seeds or hyperparameters.
See the full instruction examples Docker Images Documentation for how to set up your Docker image to support command overrides.
required_datasets
List of datasets required by the job.
No datasets:
"required_datasets": []
One dataset:
"required_datasets": ["mnist"]
Multiple datasets:
"required_datasets": ["mnist", "cifar10"]
Datasets are mounted read-only inside the container:
/workspace/datasets/<dataset_name>
Example:
/workspace/datasets/mnist
Datasets Must Be Uploaded Before Submitting Jobs
Datasets must be uploaded to the CARES NAS before submitting jobs that require them.
If you submit a job that requires a dataset that does not exist, the job will fail to start.
See Datasets Documentation for instructions on how to upload and manage datasets.
required_worker_ids
Normally leave empty:
"required_worker_ids": []
Only use this when instructed by an administrator.
Example:
"required_worker_ids": ["gpu01"]
Future Feature: Select Specific Workers
In the future, we may allow users to select specific workers for their jobs.
This would be useful for running jobs on machines with specific hardware (e.g. GPU machines) or for debugging issues that only occur on certain workers.
For now, all jobs are automatically assigned to workers by the scheduler and users should avoid specify required worker IDs as it will limit the jobs ability to be scheduled.
resumable
Optional. Defaults to false.
"resumable": true
Resumable jobs are designed for long-running workloads that periodically save checkpoints or other restart state.
A resumable job can recover after:
- an unexpected worker or machine interruption
- scheduler-controlled opportunistic preemption
Your application must save the state required to continue into:
/workspace/output
When a resumable job starts again, previously saved output state may already be present in /workspace/output.
For example, a training job might periodically save:
/workspace/output/checkpoints/latest.pt
and check for that file whenever the container starts.
from pathlib import Path

checkpoint = Path("/workspace/output/checkpoints/latest.pt")

if checkpoint.exists():
    print(f"Resuming from {checkpoint}")
    # Load model, optimiser, training step, etc.
else:
    print("Starting from scratch")
If a worker or machine unexpectedly restarts, surviving local job state may be reused when the job is restarted.
For scheduler-controlled preemption, resumable output state is persisted to the NAS before the job is returned to the queue. When the job is later scheduled again, that saved state can be restored onto the worker before the container starts. The resumed job may therefore run on a different worker.
Your Code Must Support Resuming
Setting:
"resumable": true
does not automatically resume your application.
Your code must:
- periodically save useful state or checkpoints
- save them under
/workspace/output - check for an existing checkpoint when starting
- restore the checkpoint before continuing
The scheduler preserves and restores files. It does not understand your application's checkpoint format.
Resumable Jobs and Opportunistic Scheduling
Runtime and resumability affect how jobs outside your Normal and Overflow allocation are scheduled.
- Jobs requesting 24 hours or less may run opportunistically and are protected from automatic preemption.
- Jobs requesting more than 24 hours must be resumable to run opportunistically.
- Long resumable opportunistic jobs are protected for the first 24 hours of each execution stint and may then become preemptible.
See Job Priorities and Scheduling Tiers for the full scheduling and preemption rules.
Recovery Scope
Resumable recovery applies to unexpected worker or machine interruptions and scheduler-controlled opportunistic preemption.
Normal cancellation, timeout, or application failure should not be treated as a checkpoint-resume mechanism.
Submit the Job
There are three ways to submit jobs:
A. HPC Web Portal
The HPC web portal provides a user-friendly interface for submitting and monitoring jobs.
Log in to the portal using your university UPI and provided password from the administrators. Click on Submit Job, fill in the required fields, and submit your job.
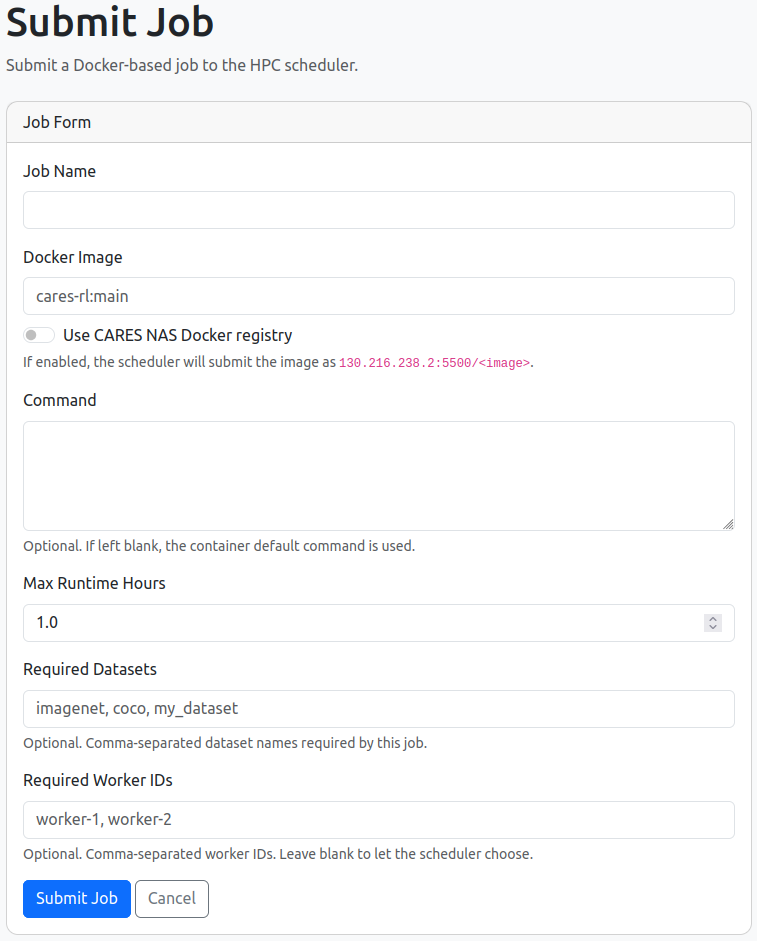
B. HPC-Client Command Line
The hpc-client command-line tool allows you to submit jobs directly from your terminal.
Create job.json:
{
  "job_name": "count_to_60",
  "image": "130.216.238.2:5500/count-to-60:latest",
  "max_runtime_hours": 1.0,
  "resumable": false,
  "command": null,
  "required_datasets": [],
  "required_worker_ids": []
}
Submit:
hpc-client login <upi>
hpc-client submit job.json
Example output:
count_to_60_260616120000_abcd
Full instruction on how to use the hpc-client can be found in the HPC Client Usage Guide.
C. Python API
The hpc-client can also be used directly from Python for autoamting job submissions.
Example:
from hpc_client import HPCClient

client = HPCClient(scheduler_url="http://scheduler.example.nz:8080")

client.login(
    username="abc123",
    password="your_password",
)

job_id = client.submit_job(
    {
        "job_name": "experiment_001",
        "image": "130.216.238.2:5500/my-project:latest",
        "max_runtime_hours": 4.0,
        "command": "python train.py --seed 1",
        "required_datasets": ["project_xyz"],
        "required_worker_ids": [],
    }
)

print(job_id)
This is useful for:
- Hyperparameter sweeps
- Reinforcement learning benchmarks
- Automated evaluation pipelines
- Batch experiment submission
Full instruction on how to use the hpc-client can be found in the HPC Client Usage Guide.
Step 7: Monitor the Job
You can monitor the status of your job through the HPC web portal or using the hpc-client automation.
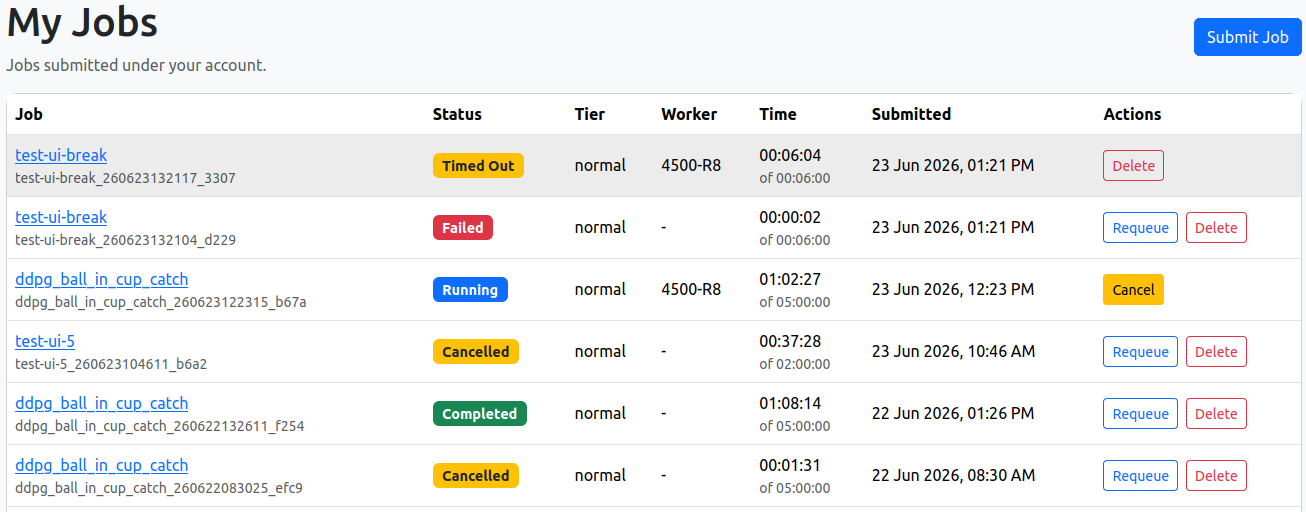
Step 8: Retrieve Results
Results are available after the job completes through the shared HPC storage on the CARES NAS.
The CARES NAS is accessible at: http://130.216.238.2:5000
Anything written to:
/workspace/output
within the Docker container is preserved.
Example:
("/workspace/output/metrics.csv").write_text(
    "episode,reward\n1,123\n",
    encoding="utf-8",
)
Recommended structure:
/workspace/output
├── checkpoints
├── figures
├── models
└── results
Full instruction on how to manage the outputs of your Docker container can be found in the Outputs Documentation.
Outputs Must Be Written to /workspace/output
Only files written to /workspace/output are preserved after the job completes.
Any files written to other directories inside the container will be lost.